

There comes a time when technology changes and adapts to become something mainstream, able to fulfill the needs and budget of the common man. The edgertronic affordable high speed camera is such a product. It aims to democratize and produce quality high speed imaging affordable for the first time to a plethora of users and markets. Does it succeed? Does it herald the arrival of professional high speed imaging for the common man? Do I need this camera in my arsenal of gear? This review will aim to answer those questions and more and see what the edgertronic by Sanstreak delivers in their affordable package.
A Little History…
Back in September 2013 Michael Matter the brains behind the edgertronic hardware development went to Kickstarter in an effort to gather funds to support the project and gauge the interest for such a product for the camera gear community.
By that time the project already had gone through two revisions or hardware prototypes A and B that were working fully. The project was headed to final revision C with a finalized hardware circuitry, case design, camera mount and ports. In just a month that the project was posted on Kickstarter, it was fully funded with 109 backers who pledged $170,175 USD.
With the development money in hand, and cameras now expected by backers; Sanstreak, Mike Matter and also Juan Pineda “the software architect behind the camera” went to work on finishing and building the final cameras. These cameras were ready and delivered to backers starting in December 2013. To the surprise of many the cameras performed and worked as advertised and lots of content started to be produced and science experiments to be performed.
Launch video for Kickstarter campaign:
The name of edgertronic as the video shows is in honor of Harold Eugene “Doc” Edgerton (April 6, 1903 – January 4, 1990) who was a professor of electrical engineering at the Massachusetts Institute of Technology credited with the development of the stroboscope which is a precursor to today’s high speed video. He is also commonly mentioned as the father of modern high speed imaging.

Flash pulses freeze objects in motion at high speed and captured on film like that of a modern DSLR high speed stroboscopic hot shoe flash function. Doc inspired Mike Matter to develop his own flash strobe and take high speed images and eventually go to MIT himself to become an engineer. Mike Matter has since worked at Apple among other Silicon Valley companies developing top products for decades. The edgertronic is his own creation and contribution for the world of high speed imaging.
An interesting note is that manufacturing, assembly and design are done in the USA, for those folks who are keen on buying products made in America, this camera fits the bill perfectly!
Development has continued on the camera and lots of new features have been added to the software that are hardly present in many high speed camera solutions. To their credit, the edgertronic engineers delivered a product on time, that exceeded backer expectations and continues to sell. By mid April 2015, the edgertronic has been shipped to nearly 400 buyers. Talk about a concept well executed.
The Final Camera:
As with many high speed cameras the edgertronic comes in two main varieties. There is a Color version that has ISO sensitivity of 100-1600 plus an IR filter, and a Monochrome version with sensitivity of ISO 400-6400. By eliminating the Bayer sensor pattern for the color version sensor, the Black and White edgertronic has much better low light performance and hence detail at the maximum resolution of 1280*1024 of the sensor. Contrary to popular belief the Monochrome version outsells the color camera.
The final specs of the camera are as follows:
edgertronic final specs: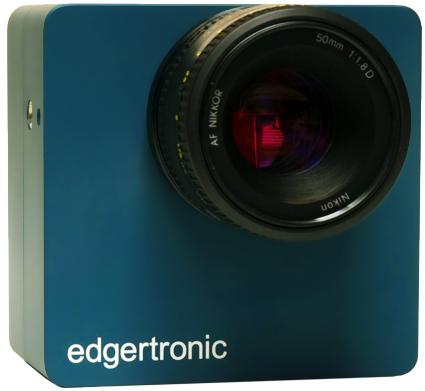
- Global Shutter without any rolling shutter
- Exposures down to 1/200,000 seconds
- Resolution settable from 192×96 to 1280×1024
- ISO 100-1600 sensitivity (color), ISO 400-6400 (monochrome)
- Frame rates up to 17,791 fps (resolution dependent)
- Stores captured videos in H.264 format on a removable SD card
- Web-browser based control panel (Google Chrome)
- Compact 111x108x79 mm form factor (size of a D-SLR)
- Field upgradeable software/firmware
- MSRP $5,495 Both Color and Monochrome
Unboxing the edgertronic:
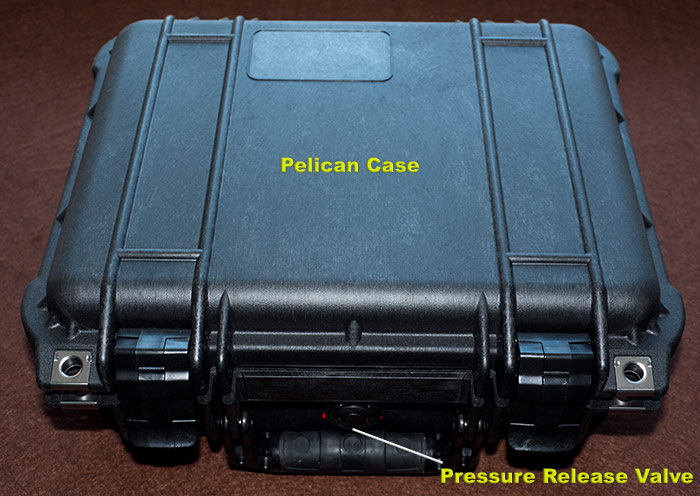
We were sent a demo “retail” unit which is a carbon copy of what the customer receives when they get their new edgertronic camera. The first impression is of wonderment when looking at the Pelican Case, which comes standard. This case is durable, dust proof, watertight “not waterproof” and resists changes in atmospheric pressure like that of plane cargo bays. It has a built in purge valve for pressure release before opening. Pelican cases are a de-facto standard for shipping costly camera gear across the globe and shipping the camera in one of these cases is an ideal match for storing it after use as well. It will be ideal if more manufacturers shipped their cameras in such a case.
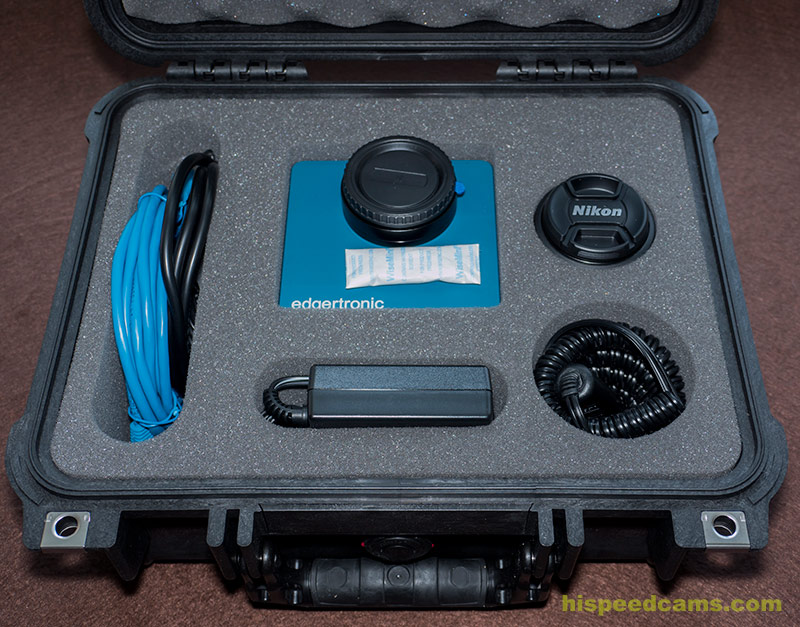
After opening the case with both latches you are greeted with a well organized foam cut layout of the camera and accessories. Everything is self contained in a comfortable space with even more space for foam modifications if your needs go past the included kit.
By tightly fitting the components in foam, the camera can be shipped with minimal external packaging as the kit components are safely stored for shipping and even moderate impacts common on FedEx and UPS shipments. The Pelican Case is built for severe impacts but you wouldn’t want to test that theory with such a piece of precision gear.
On the left you can find the trigger, extender trigger cable and ethernet in blue. On the center the edgertronic body and AC adapter with it’s respective power cord. The right side is taken by the included 50mm Nikon 1.8 D Lens and the 12v Car style adapter which is recommended for Bescor, Anton Bauer and batteries built for steady output for cameras and other similar gear. While it could theoretically work of the car connector and probably does, we didn’t want to risk it on this demo unit. We decided to use a Bescor 12v 4.5amp Single Pouch Battery Pack About $80 at Amazon. The Battery pack lasted over 6 hrs of continuous portable use of the camera without any problems.
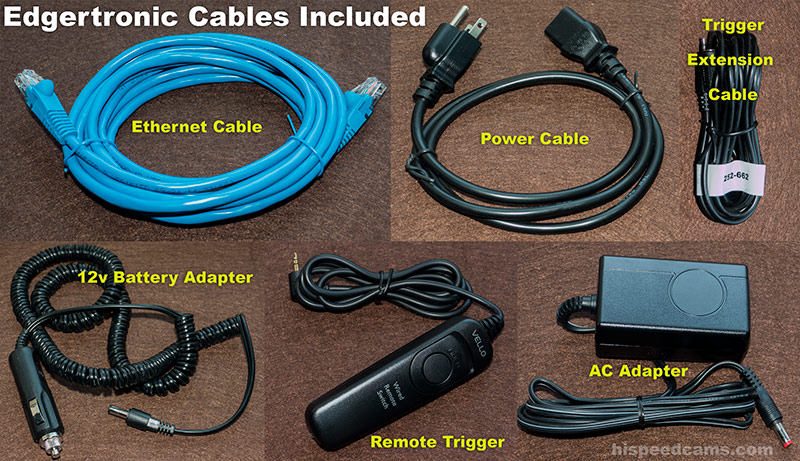 The included cables are meant to provide a fully shoot ready camera kit. You will be hard pressed to go out and find something missing to fully use the camera right out of the box. This is a good decision as it becomes much easier to get started with the camera and forget about connector compatibility nuances.
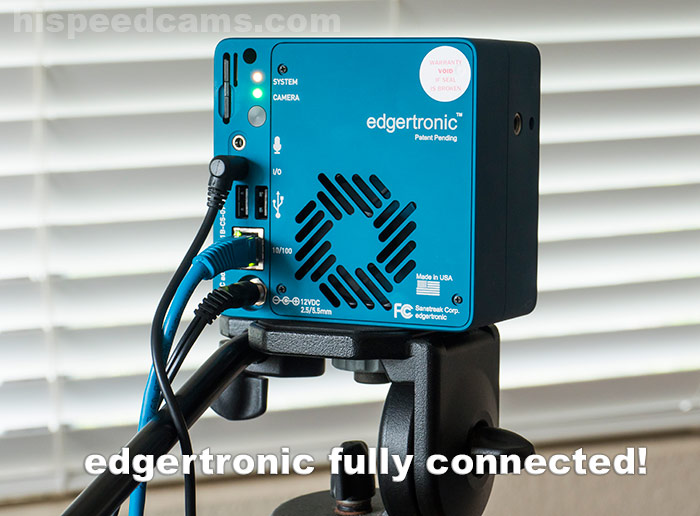
We however recommend that after a while you get an even longer Ethernet cable if you plan on mounting it on a crane or hard to reach place. The good thing is that Ethernet is very easily adapted over long distances up to hundreds of feet. We tested a 50ft cable without any need for a router boosting the signal direct to our control laptop.
Documentation: There is an included page of instructions printed from both sides. That gives you a quick guide of what to do and where to get the rest of the info about operating the camera. We had no problem operating the camera by following the guide at http://wiki.edgertronic.com/ pointed in the included page. However other users might feel it a little daunting to start using the camera without a friendly quick start guide. Could it be improved? Yes – Does it really matter? Not much. If you buy a camera like this you should probably already have some experience in using a camera and its settings, if you can operate a DSLR it is as easy or even easier to operate the edgertronic. The rest is networking which is as easy as following 3 steps. More on this on the usability part of this review.
The Camera Body:
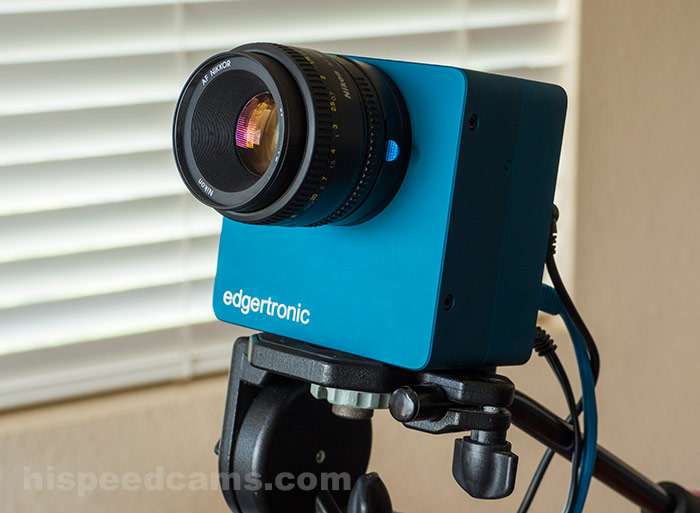
 Once you take out the camera body it is apparent that a lot of care went into designing and polishing the little details in the simple but useful case. The Type III Hard Anodized Aluminum enclosure in aqua “Teal” blue color, is beautiful to look at and it is supposed to be hard to scratch or dent easily.
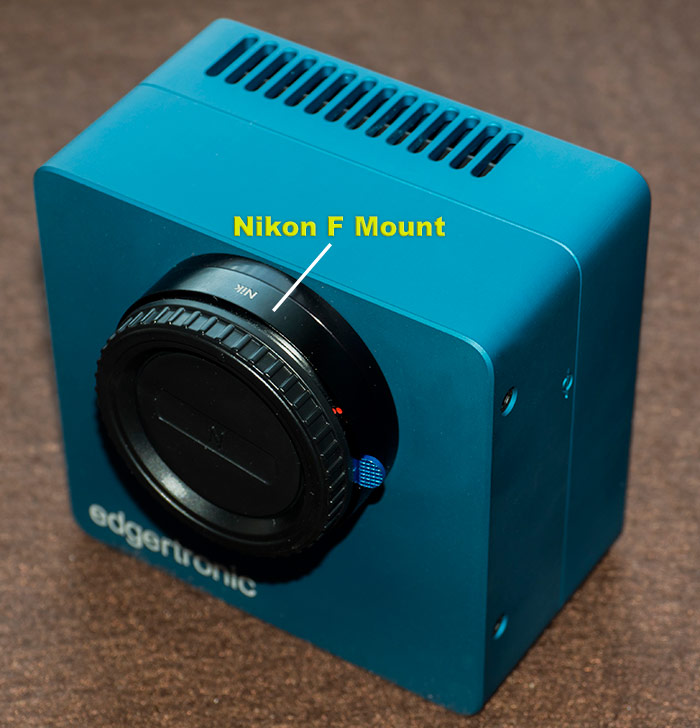
The Lens Mount is a Nikon F mount with a very good machined tolerance lens grip and release mechanism. The lenses will not rattle or wobble by any perceivable amount once they are twisted and locked into the mount. Quite a solid and pro feel, as good as an SLR Camera. The mount is solid metal “looks to be a Fotodiox built part” and will easily support heavy large aperture lenses. However if the lens is a large telephoto you will mount the lens and let the camera be locked to the back of it instead as with any large lens. The camera mount due to the Nikon F mount being of longer flange distance from the sensor plane than other popular systems like Canon EF, Panasonic Micro 4/3, Sony E mount will not support them. However a multitude of other lens systems can be fitted with adapters see the list we researched:
Lenses Compatible on Nikon F Mount – Adapters Sold Separately:
- Sony A Mount
- Telescope T Mount
- Contax/Yashica
- M42 Mount
- Canon FD mount
- Mamiya 645 Lens Mount
- Leica R Pro
- Olympus Zuiko OM Lenses
- Pentax 67 Lens Mount
- Voigtlander DKL Pro Lens Mount
- Minolta MD Mount
- Pentax K Lens Mount
To many the lack of compatibility with the EOS mount will seem disappointing to buyers with a newer set of Canon glass, but considering how many lenses can be adapted and the fact that the mount can’t control the Auto Focus or aperture on those or any lens as it is a non electronic version of the Nikon F Mount, makes it for less of a possibility in the first place. In our view a Micro 4/3 or Sony E Mount are the ideal candidates for camera compatibility as almost any lens can be adapted to those mounts with the respective adapter.
The choice of the Nikon F Mount was made by the edgertronic team for having a solid problem-free mount that had popular widely available lenses with manual apertures like those in the Nikon F mount “except Nikkor G lenses that lack an aperture ring”. We tend to agree with the statement and considering how good the implementation turned out it is hard not to see how this was a good compromise.
The Included Lens:
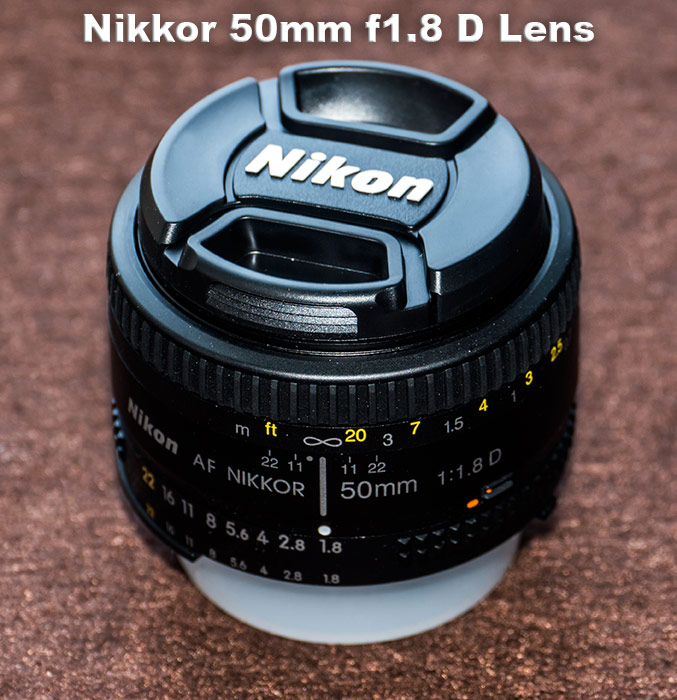
The included 50mm Nikkor 1:1.8 D lens with manual aperture ring and a fast f1.8 maximum aperture is a versatile and useful standard lens. It is sharp, dependable and very high quality above f2. You could use this lens with the edgertronic exclusively without changing it for other lenses in your use of the camera and be content with the performance. The idea was to offer a complete kit out of the box with minimum setup time and this lens makes it possible.
The Camera Body:
You wont find a grip or handle on this camera for a simple reason, it is intended to be tripod or cage mounted and not for hand holding but that doesn’t mean holding it and shooting is impossible; the size and weight of just 862 grams without lens of the camera makes it very easy to adapt handles or grips to easily kit the camera for portable use. More on that later in the review!
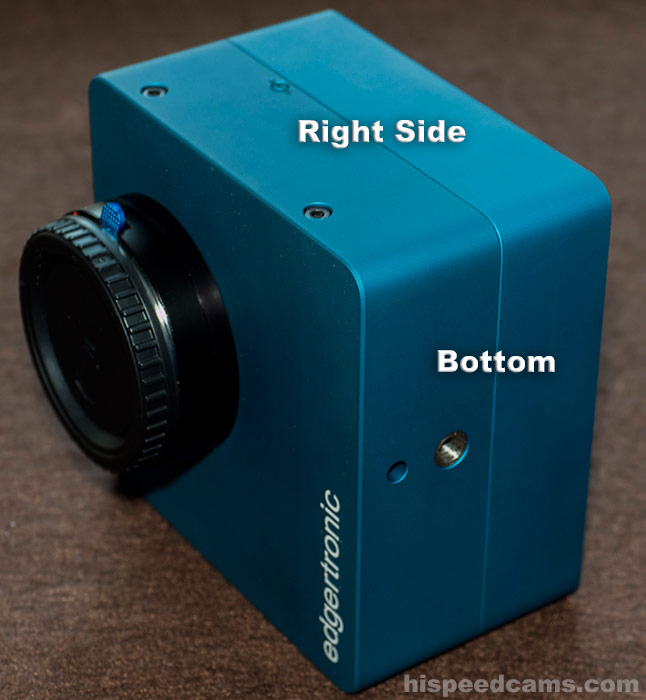
The body has two tripod 1/4 inch screw mounts with recessed lock support which is ideal for the camera being oriented properly on a tripod mount at all times with no angle drifting.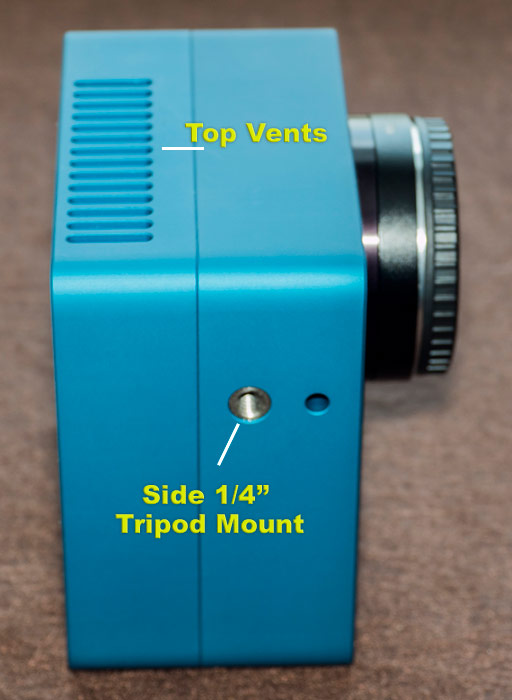 There are vents on the top of the unit and a fan on the back for heat dissipation. The camera is well cooled and seldom gets hot even in direct sunlight for a few hours the camera never reached an internal top temp over 46 C. The camera is designed for 24/7 operation and dependability and it delivers on that promise by working non stop for our testing in several conditions.
Back of the Camera:
The edgertronic camera has quite a few ports on the back and it allows for good customization and expansion.
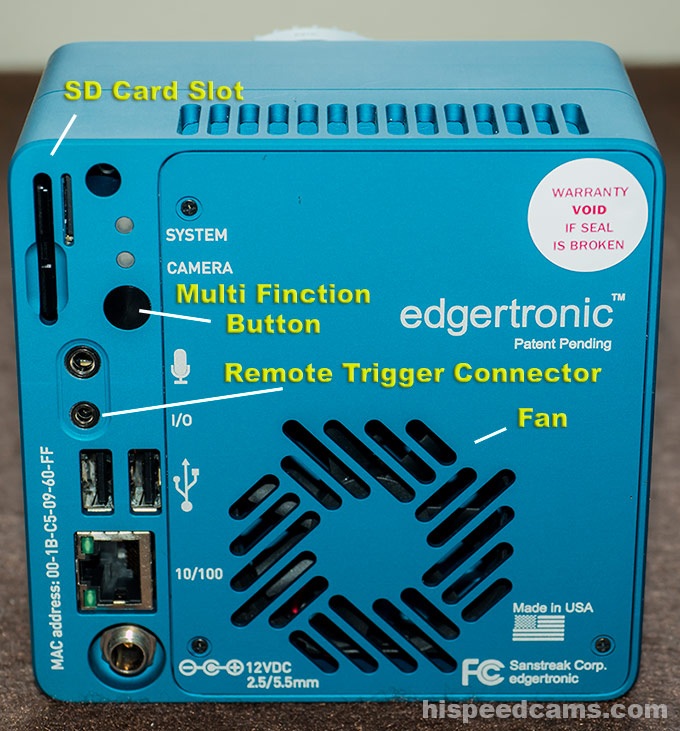
Storage: On the top left we have the SDHC Card compatible slot “Does not support the SDXC standard” formatted in Fat 32. We tested a Sandisk 32GB 30MB/sec HD Extreme video rated SDHC card with no problems. We were supplied with an 8GB SD card in the kit which was quickly swapped for more storage space. The SD Card has to have the Label of the card oriented to the left outside of the body and not to the interior for it to insert and lock; Right next to the SD card slot is the Micro SD card slot that has the camera software and space sufficient for customizable settings and software updates as they become available. You do not need to remove this card at any point as all updates can be done from the regular SD card by copying the file to the root folder of the Fat32 formatted card easily.
Top Indicator LEDs: The camera has two multi color LED indicator lights that show the status of the camera at all times. They flash in different patterns and colors to inform the operator of the status of the system. This sounds complicated but in use it becomes second nature after a while as solid lights in blue “System” and green “Camera” mean the camera is working and ready to take the next shot. For all the patterns and flashing of the LEDs and what the mean see the edgertronic wiki entry here.
Multi Function Button: The only button that the camera has is the one located below the system and camera LEDs. You do not use this to turn the camera on or off that is done by connecting and disconnecting the power cord like you would do for an appliance. The button if pressed when the camera is ready will start recording footage if pressed exactly what the trigger controller will do if pressed. the other use of the button is done by leaving it pressed and will reset the camera to factory settings when turned on. Not recommended except in the case of troubleshooting or needing a hard software reset for a reason.
Audio Connector: Currently deactivated but it will let the camera record audio from a microphone on a future release if needed.
Trigger Connector: A standard 2.5mm trigger connector and or daisychain genlock cable can be inserted in this port allowing for quick recording of an event.
Some Compatible triggers:
- Canon RS-60E3
- Vello RS-C1II
- Pixel RS-201
Dual USB Ports: The two USB ports supplied allow for connecting a USB portable device like a USB stick, or 2.5 inch 5v portable Hard disk formatted in FAT 32 standard. If you insert a device while the SD card is also present the recording will default to the USB device automatically. We tested a Toshiba portable 750GB travel hard drive formatted in FAT32 with success but would rather record to the SDHC card for simplicity. However it is good to have the ports if the need for expandability arises like that in a lab, studio or industrial setup that needs continuous access to the files.
10/100 Ethernet Connector: This will be the main connector to interface with the camera. You plug the cable on this end and then directly to a desktop computer, laptop or router for access in the network. You then control the camera by using the browser “Google Chrome Recommended for Stability and Compatibility” The MAC network address is clearly printed in the back of the camera if needed, good thinking on this design decision!
12v DC Power Connector: This is the power connector which if connected turns on the camera immediately and off when unplugged, the connect disconnect serves as the camera on and off switch. You plug in the end of the included AC adapter and or you can use the included 12v Car style adapter for portable batteries. If you unplug when the camera has not finished writing the file you will loose the shot or corrupt the memory card, make sure the camera has finished recording before you unplug the power.
The Sensor in the edgertronic:
The edgertronic is an interface connected to a state of the art sensor and the one that the camera sports is a pretty impressive one.
Specs:
- 17.92*14.34mm active area, 14um pixels
- 1280×1024 CMOS Image Sensor
- ISO 100-1600 sensitivity (color), 400-6400( monochrome)
- 10 to 17791 frames/sec depending on resolution
- Global shutter settable from 1/10 to 1/250,000 sec
For starters it is not a CCD but a CMOS Sensor but one with a global shutter. The common CMOS sensor like the one on DSLR cameras has a weak spot called a rolling shutter. The camera records images by lines usually from the top down in order to read the entire extent of the sensor and produce an image. This creates a wonderful looking image with little noise but the subject is not captured at the same moment in time. It is however captured at a fast but offset speed depending on the sensor and camera used. The speed at which the subject moves is critical for cameras with rolling shutters to show the artifact or not.
HSC Tests the edgertronic Global Shutter vs GH4 Rolling Shutter:
In the above rolling shutter vs global shutter test; you can see that in reality the strings on the guitar do not bend but just vibrate and stay almost completely in a straight line on the edgertronic camera with a global shutter. On the GH4 with it’s rolling shutter the strings vibrate in a wave pattern showing deformations that are not actually there. Hence why for scientific purposes the Global shutter is a must have!
For a high speed camera the rolling shutter would be a complete disaster. The camera would not be able to read the action as it happens with enough speed and would deform the subjects making them elongated or curved. This for scientific applications is prohibited as measurements and phenomena need to be studied in complete detail. For Film makers, cameras like the Sony FS700 with a rolling shutter, do work fast enough for frame rates of 240p or even 480p with reduced line readout. However for faster frame rates you need a global shutter to preserve image integrity.
The edgertronic sensor has an advanced global shutter circuitry that allows it to avoid rolling shutter completely as a CMOS sensor. This however does limit the ISO range of the camera as the extra circuitry creates added heat and noise in the analog to digital signal stage. In the end the edgertronic is capable of up to 18,000 frames a second with no rolling shutter to speak of. This spec until now was extremely expensive to include in a camera. Other high speed cameras that cost several orders of magnitude more than the edgertronic have had a global shutter for years in a CMOS senor but never at this price. The closest competitor today is around 20,000 USD for a basic camera like the Fastec T3 or T5 Cine.
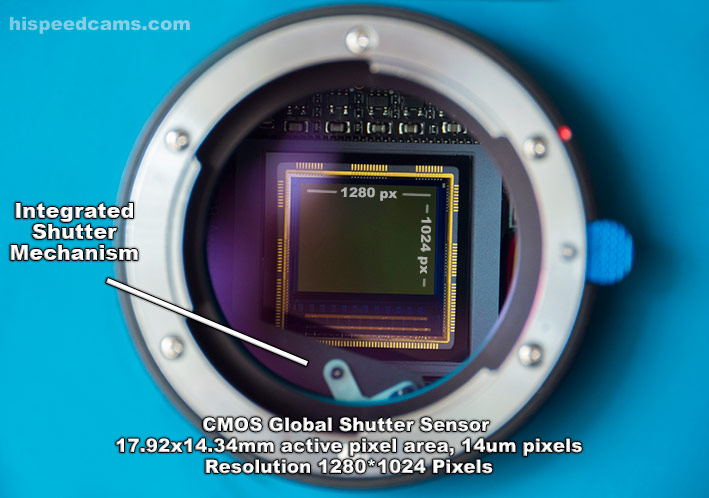 The pixels on the sensor are enormous at 14 microns in size due to the 1280*1024 resolution, in comparison a Canon EOS 7D camera at 18MP has 4.3 microns. The dynamic range and sensitivity of the edgertronic camera is extremely good especially in monochrome at ISO 400-6400. If this was a rolling shutter sensor it would be a class leading one. The dynamic range is so good that it preserves highlight and shadow detail comparable to a RAW image. We estimate about 10-12 stops depending on ISO setting used and saved on H.264 codec. If it was saved as RAW 13 or 14 stops could probably be extracted.
Shutter Mechanism: The edgertronic also has a physical shutter mechanism that is used for obscuring the camera during automatic calibration. Calibration is something you need to reduce signal noise and tailor the sensor to operate it’s best at a given shutter speed and ISO setting. This reduced the noise pattern on the final image. It takes a series of black frames to do it and the integrated shutter saves this step transparently to the user. Many high speed cameras have to be calibrated after every ISO and shutter change in order to preserve optimal image quality; it is a manual and pain staking process. This is a great feature to have and it works very well on the edgertronic and makes for a fluid shooting experience with just 2 seconds of downtime every time it calibrates.
Frame Rates Supported:
The edgertronic is a pretty versatile little machine when it comes to frame rates. Most affordable cameras that offer a high speed function top out at 120fps or 240fps. Some pretty good ones go up to 480fps or 960fps like the Sony FS700 but at severely reduced resolution. The edgertronic on the other hand can do from 10fps all the way to 17,791fps at reduced resolutions. At full 1280*1024 it offers a maximum of 494 fps and at the lowest resolution 192*96 pixels ig gives the full 17,791fps.
The Setting that most people will use for TV, the internet and Film that offers the balance between resolution, quality and frame rate will be 1280*720 HD or 720p. At this mode the camera does 701 frames a second which is slow enough to record mos human motion, wildlife subjects like insects and birds. It is also a great setting for food, object fractures, falling objects and sports analysis. Film makers and video pros would want to stay here for optimal quality and slow motion goodness.
Overclocking: The edgertronic now also offers due to free software upgrades the capacity to overclock the sensor and offer significantly higher frame rates at all resolutions but with some trade offs that will generate some artifacts like ghosting. In part 2 of this review “Using the camera” we’ll go in depth for overclocking and what it offers. However the camera is solid and dependable on the normal mode. The table below can give you an indication of what frame rates are available at common popular use resolutions:
| Resolution | Frame Rate |
|---|---|
| 1280*1024 – Full Sensor | 494 fps |
| 1280*720 HD | 701 fps |
| 1024*768 | 799 fps |
| 864*688 | 1,000 fps |
| 800*600 | 1,255 fps |
| 720*480 NTSC | 1,705 fps |
| 640*480 VGA | 1,849 fps |
| 640*360 Half HD | 2,509 fps |
| 512*288 | 3,549 fps |
| 320*240 Half VGA | 5,712 fps |
| 240*160 | 10,113 fps |
| 210*130 | 13,067 fps |
| 192*96 Lowest Res | 17,791 fps |
The edgertronic has no locked resolution setting, you can use a combination of Height and Width on the user interface which will let you get a plethora of frame rate variations depending on resolution. The duration time of recording in seconds will also vary. At full resolution and 720p it is close to 10 seconds recording while at the lowest resolution it jumps to 20 seconds.
The camera is capable of recording at 1 Gigabyte a second internally from the sensor to memory so the entire buffer memory of 8GB on our sample would fill up in 8 seconds. The time is longer in practice because the sensor resolution even at maximum pixel dimensions is lower than the 1 GB mark. In use however you will very rarely be recording 8 seconds of video, more like 1 to 4 seconds max due to the pre-trigger function. More on this on part two of the review.
Final Design Notes: We were very impressed by the edgertronic design and build quality. It is rugged and very functional. The addition of two tripod 1/4″ mounts is ideal for creating a custom setup and the ease of setup is a plus. The camera seldom gets warm after hours of use and is dependable on hot temperature settings. It is rated up to an ambient temperature of 50 degrees Celsius. If there is one thing we would love to see either from edgertronic or a third party is a weatherproof enclosure that allows for some degree of water and dust proofing. You could very easily buy an EWA Marine style plastic bag but heat build up could be a problem in a sealed environment. Your best bet for keeping it safe from water splashes or dust is to use a regular video camera water cover like those for ENG cameras. Some owners of the camera have constructed submarine enclosures and blast-proof enclosures with success, however a product like the Altura Photo Professional Rain Cover for DSLRs could fit the bill in this situation for under $15.
For more Information about the edgertronic camera or for purchase visit: http://www.edgertronic.com/
END of Part 1: Thanks for your support of HSC, your help keeps reviews like these keep coming! Rest of this review below:
Great review, As a user of a Edgertronic I think you did a great job! And thank to the edgertronic team for making a great product.
Thanks Pete, working on Part 2 and 3 at the moment this was just the start. Thanks for your support!
hi me interesa saber el costo de esta camara EDGERTRONIC HIGH SPEED CAMERA por favor
see http://www.edgertronic.com for order info!