

Continuing with the free ways to combat flicker in timelapse, slow motion video and regular video we now turn to Virtual Dub and the Deflicker Filter for the app created by Donald Graft.
Virtual Dub is a GNU Public License distributed application for Windows in 32bit and 64bit versions. The Deflicker plugin only works in 32bit mode so stay with the Virtual Dub distribution in 32 bit only.
Installation:
Download Virtual Dub Here 32Bit for Windows 98 to Windows 8.1 Mac Users will have to run it in Bootcamp.
Once you download Virtual Dub just unzip the file and the executable is ready to go, however you still have to install the Deflicker plugin in order for it to work.
Download the Deflicker 1.3 Filter for Virtual Dub Here!
Place the Deflick.vdf file inside the plugins32 folder. Then re-open Virtual Dub.
The application is not pretty to look and and a little daunting at first but it is pretty straight forward and very powerful.
You need to have your footage in a format that Virtual Dub will understand and will be able to use without much trouble. Quicktime is not really supported despite some coders doing some work on it so you will need to use .avi .asf or .mpeg-.mpg videos in order for it to understand it. For your clip you should trans code the footage in an intermediate codec with low compression. We chose AVI YUV uncompressed in after effects in order to prepare the clip for Virtual Dub.
Step 1:
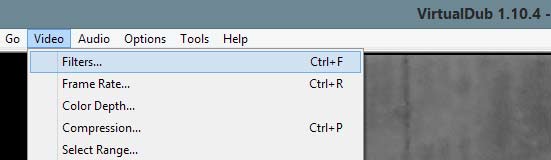
Once you get your video open in Virtual Dub “File Open Video File” you now have to apply the filter to it. Go To Menu Video and choose Filters…
Step 2:
Choose the Option Add… and You will enter the filter Selector:
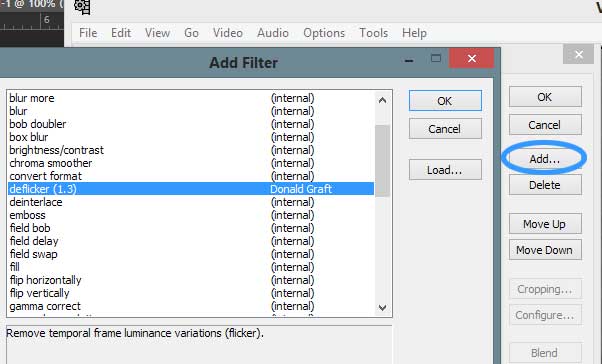
Navigate down to deflicker by Donald Graft and press the Ok Button.
Step 3:
The filter deflicker window options will appear.
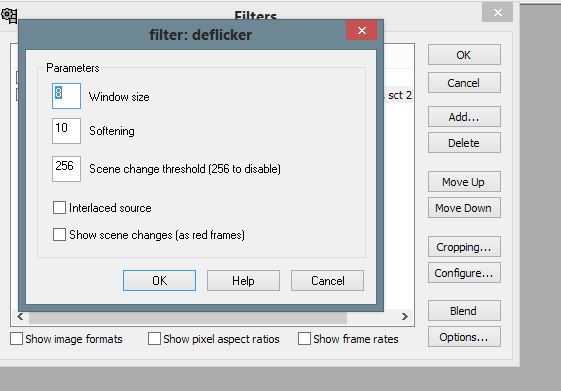
Default settings work well for most time lapse footage and old archival footage. As for custom settings for slow motion see below:
The following tweaking of options are available according to the Deflicker Info File:
Window size: This is the size of the moving average of frame luminance values. This produces the luminance value that frames are adjusted to. The idea is that you want it as small as possible while still removing flicker. Ideally, it is equal to the number of frames that one flicker period spans. For example, if the video frame rate is 25 fps and the flicker is at 7 fps (example of 18 fps shot at 25 fps; 25 -18 = 7), then one flicker period is 25/7 = 3.57 frames. We want our window to exactly cover an integral number of flicker cycles. So a good choice here would be a window size of 7 (~ 2 * 3.57). You can always set a long window size if in doubt, but doing so will spread out luminance changes in the clip. A window size of 10 is a good general-purpose compromise.
HSC: We found that for super slow motion lower values on the window size for flickering lights worked more than larger values. You need to count the period in which the flicker occurs and repeats. In Super slow motion this can be quite short and a window period of 2-8 worked best.
Softening: This is the threshold for the final temporal softening phase. Often, the physical process that creates the flicker also creates within-frame illumination changes, causing adjacent frames to differ. This softening phase greatly reduces this effect. A higher number causes greater temporal softening but can leave motion trails. If the physical process does not produce within-frame changes, this phase can be disabled by setting the softening to 0.
HSC: Softening will work better for super slow motion with higher frame rates however it can be detrimental as it can create motion blur on objects close to what the first article in this series discussed. Keeping this setting below 10 seems to reduce the artifacts.
Scene change threshold: At a scene change it is desirable to reset the filtering so that sudden changes of luminance are not smoothed out by the filter. This threshold determines the sensitivity of the scene change detection. Use lower numbers for more sensitive scene change detection. Use a threshold of 256 to disable scene change detection.
HSC: This setting can help preserve luminance changes that you want in the scene but we found it didn’t do anything noticeable enough on super slow motion to enable it. However for time lapse it does help in some cases.
You should experiment with this settings by pressing enter in the Virtual Dub interface to preview the footage with filters applied.
We found for 256fps and 120fps these work well: 6-8-256 If banding is still a problem increase the 6 and 8 accordingly.
Step 4:
Rendering the footage back with the effect applied needs two steps.
A) You first need to specify the codec in which the video will be rendered on. We select Intel IYUV which is a Lossless codec and very compatible. If you install a codec pack you might get better options.
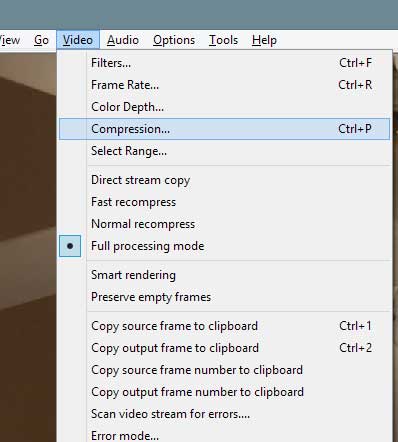
A) Click Video>Compression and select your codec.
B) Choose now File>Save as AVI and choose where your file will be saved.
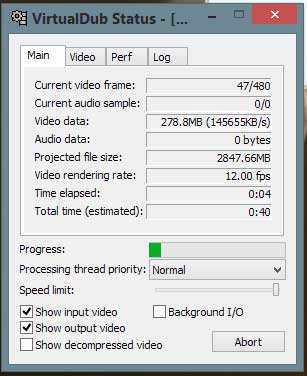
Virtual Dub will now start rendering the footage and when done you will have your de-flickered file where you specified a location. Depending on your computer it might take a while for it to be ready and it can take a lot of hard drive space especially in HD and UHD formats.
Deflicker Sample footage:
MrTerryPresley’s Timelapse Fix
deflicker Test By CharlieWild
One more thing…
There is another deflicker plugin for Virtual Dub called MSU Deflicker. The procedure to use it is the same just choosing the filter in the list changes to MSU Deflicker. However MSU is not a free plugin and requires a license for commercial use as opposed to deflicker which is free. You are free to try and use it for personal use.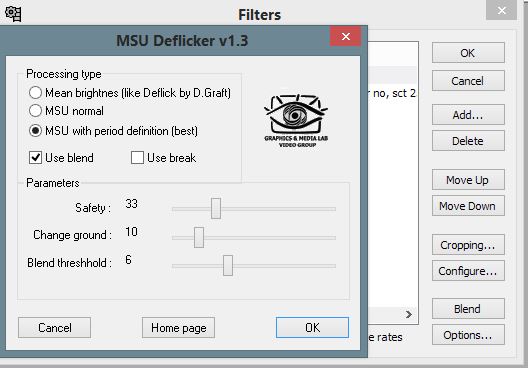
MSU Deflicker is partly based on deflicker but with improved calculations. Project, idea by: Dr. Dmitriy Vatolin – Implementation by: Kostya Strelnikov
If you use MSU Deflicker it works without a watermark and it is up to you to contact them and ask for a license if you want to use it for a paid job. We recommend compensating the author for the work in creating this plugin.
Get MSU Deflicker Here if you need it!
MSU Deflicker Video Examples:
Timelapse by Barbara Gancarek-Śliwińska
Flickery Footage Grapefruit by: Damian Karczewski
Conclusion:
Both Virtual Dub Deflicker and MSU Deflicker are amazing pieces of software to get rid of flickering in timelapse, regular footage and slow motion video. By being accessible through Virtual Dub the barrier of entry is very much non existent. If you have a flickering clip that needs a fix this is where you might start if method 1 was not working out for you.
Be aware that the results may vary but overall we are very impressed with the results and are easily in the top shelf of options for curing flicker.
Stay tuned for part 3 and 4 of this article coming soon. The paid options GBS Deflicker and Flicker free from Digital Anarchy are some tailored paid software for that flicker elimination you just need done for your footage. The best is yet to come!
- Part 1 Of This Article Click Here!
- Part 3 Of This Article Click Here!
- Part 4 Of This Article Click Here!
Hi.
Just wanted to add that you don’t really need to convert your footage to the format that stock VirtualDub can handle.
The real power of VirtualDub is the AviSynth usage. Yes, you would need to embrace some scripting but then you can just use plugins to import any footage (most likely separate plugin for each non VitualDub native codec) and via script use Deflicker or any other plugin out there, and believe you me, there are some superb plugins for almost everything.
The only disadvantage of VirtualDub that I can see is that it’s linear editing software and you have to apply plugins to the whole footage.
We are aware of plugins even a Quicktime one along with codec packs. This was intended as a simple guide to get flicker out. Virtual Dub is a very deep and powerful application and only scratched the surface with the article. Still in the end there is no match for flicker removal in Virtual Dub to our pick in part 4-Flicker Free.